Disclaimer
Hi, just letting you know that all products recommended here have been used by me, or are properly researched to ensure they are the best you are getting without bias.
I am also an affiliate for certain Amazon products and this means that some links here are affiliate links. If you purchase an item through any of them, I MAY earn a commission at no extra cost on you.
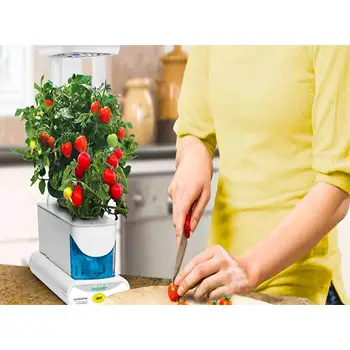
Aerogarden, a renowned brand specializing in indoor hydroponic systems, has gained immense popularity for its ability to cultivate herbs, vegetables, and flowers effortlessly within the comfort of our homes. While Aerogarden provides a range of seed kits and pre-seeded pods, some users might be curious about the possibility of utilizing their own seeds.
In this post, we will examine the feasibility of using your own seeds in an Aerogarden, discussing the advantages, challenges, and potential tips for maximizing success. We understand that as gardening enthusiasts, the desire to experiment and personalize our growing experience is inherent. Therefore, it is crucial to explore the compatibility of various seeds with the Aerogarden system, the potential benefits of using your own seeds, and the steps required.
Can you use regular seeds in an aerogarden?
One common question that arises when using an Aerogarden for indoor gardening is whether you can use your own seeds instead of the seeds that come with the aerogarden. The answer is yes, you can use regular seeds in an Aerogarden, but there are a few factors to consider:
- Firstly, it’s important to note that not all seeds are suitable for hydroponic growing. Some seeds may require soil or specific conditions that may not be compatible with the Aerogarden’s hydroponic setup. However, many common herbs, vegetables, and flowers can be successfully grown in an Aerogarden using regular seeds.
- When using your own seeds, it’s crucial to ensure they are of high quality and have not been treated with any chemicals or pesticides. Organic, untreated seeds are recommended for the best results.
- It’s also advisable to choose seeds that are suitable for indoor growing and have a shorter germination period.
Aside from using regular seeds in an Aerogarden, you can use pre-germinated seeds. This can be done by placing the seeds between moist paper towels and keeping them in a warm, dark place until they sprout.
By following these guidelines, you can successfully use your own seeds in an Aerogarden and enjoy the satisfaction of growing your own fresh produce at home.
How many of your seeds do you put in an aerogarden pod?
Many people wonder if they can use their own seeds in an Aerogarden, as it offers the convenience of growing plants indoors without the need for soil or traditional gardening methods. The answer is yes, you can use your own seeds in an Aerogarden pod. When using your own seeds, it is important to ensure that they are compatible with the Aerogarden system.
As for the number of seeds to use in an Aerogarden pod, it is generally advised to follow the instructions provided by the Aerogarden manufacturer. The number of seeds per pod may vary depending on the type of plant you are growing. For smaller plants, such as herbs or lettuce, one or two seeds per pod is usually sufficient.
However, for larger plants, such as tomatoes or peppers, it is recommended to use only one seed per pod to allow for proper growth and spacing.
In cases where you have more than one seed in a pod to increase chances of having at least one sprout, observe them when they all sprout and trim them back to give them room to grow.
What seeds can you not grow in an aerogarden ?
When using an Aerogarden, it is recommended to use pre-seeded pods that are specifically designed for the system. These pods are carefully selected and tested to ensure successful growth and optimal performance. However, this doesn’t mean that you are completely restricted from using your own seeds.
Some seeds may require specific conditions, such as temperature or light requirements, that may not be suitable for the Aerogarden environment. It is recommended to choose seeds that are known to grow well in hydroponic systems or have a short germination period.
Some seeds may not be suitable for use in an Aerogarden due to their specific requirements or growth characteristics. For example, plants that require a large amount of space to grow, such as pumpkins or watermelons, may not be suitable for the compact design of an Aerogarden.
Additionally, plants that have extensive root systems or require deep soil may not thrive in the shallow nutrient-rich water of the Aerogarden.
It’s also important to consider the germination and growth rates of your own seeds. The Aerogarden is designed to provide optimal conditions for rapid germination and growth of the seeds it come with.
Step by step guide on how to grow your own seeds in an aerogarden
Here’s a step by step guide to take note of if you’re on a journey to growing your own seeds in an aerogarden:
1. Choose the right seeds for your Aerogarden:
When it comes to growing your own seeds in an Aerogarden, selecting the right seeds is crucial for successful and bountiful growth. Here are some key considerations to keep in mind:
- Seed type
- Quality and viability
- Germination time
- Space Growth habits
2. Pre-soak the seeds for optimal germination:
To pre-soak your seeds, begin by placing them in a small container. You can use a cup or a small dish for this purpose. Fill the container with lukewarm water, ensuring that the seeds are fully submerged. It is important not to use hot water, as it can damage the seeds.
Allow the seeds to soak for the recommended time specified on the seed packet. This can vary depending on the type of plant you are growing. Typically, soaking for 12-24 hours is sufficient for most seeds.
During this soaking period, you may notice that some seeds begin to swell or float to the surface. This is normal and indicates that the seeds are absorbing water and preparing for germination.
After the recommended soaking time has passed, gently drain the water from the container, being careful not to damage the seeds. You can use a sieve or a fine mesh strainer to remove excess water while retaining the seeds.
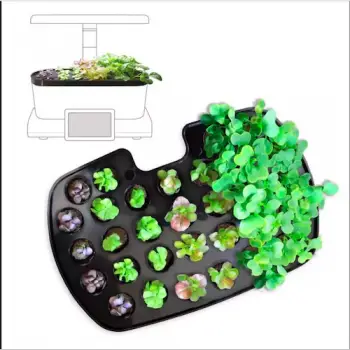
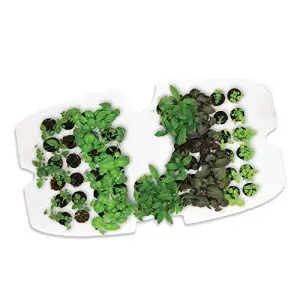
3. Plant the seeds in the grow pods:
Once you have prepared your grow pods and filled the water reservoir, it’s time to plant your seeds. Carefully place one or two seeds into each grow pod, following the recommended spacing for the specific plant you are growing. Gently cover the seeds with the provided seed cover to create a dark and moist environment that promotes germination.
It’s important to handle the seeds with care to avoid damaging them. Use a pair of tweezers or your fingers to place the seeds gently into the designated holes in the grow pods. Make sure to read the instructions for the specific seeds you are planting, as some may require pre-soaking or scarification for better germination rates.
Once the seeds are in place, replace the seed cover over the grow pod to create a mini greenhouse effect. This will help retain moisture and warmth, creating optimal conditions for seed germination. Make sure the covers fit snugly to prevent any moisture loss.
4. Set up the Aerogarden for proper growth conditions:
Here are the steps to set up your Aerogarden for proper growth:
a. Fill the reservoir: Start by filling the Aerogarden’s reservoir with water up to the recommended level indicated on the unit. It’s essential to use clean, filtered water to prevent any contaminants that could harm your plants.
b. Add nutrients: The Aerogarden comes with specially formulated liquid plant food. Follow the instructions provided to add the appropriate amount of nutrients to the water in the reservoir. These nutrients are essential for promoting healthy growth and maximizing plant productivity.
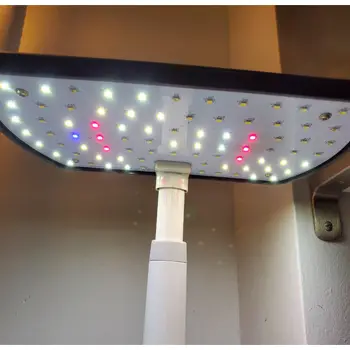
c. Adjust the light height: Position the grow lights at the correct height for your seedlings. Initially, you’ll want to keep the lights close to the top of the plants to encourage strong and compact growth. As the plants grow taller, you can gradually adjust the light height to maintain an optimal distance from the plants’ canopy.
d. Set the light timer: The Aerogarden usually comes with a built-in light timer that mimics the natural day-night cycle.
5. Monitor and care for your growing plants:
Once you have successfully planted your seeds in the AeroGarden, it’s important to closely monitor and care for your growing plants to ensure their healthy development.
Here are some essential steps to follow in this process:
- First, maintain the ideal growing conditions for your plants. This includes providing them with adequate light, water, and nutrients. Keep an eye on the water level in the reservoir and refill it as needed to prevent your plants from drying out.
- Next, monitor the growth of your plants and make any necessary adjustments. As they start to sprout, ensure that they have enough space to grow by pruning any overcrowded or weak seedlings.
- Regularly inspect your plants for any signs of pests or diseases. If you notice any issues, take immediate action to prevent further damage. This may involve using organic pest control methods or removing affected plants to prevent the spread of diseases.
Conclusion
In conclusion, while it is technically possible to use your own seeds in an AeroGarden, it is important to consider a few key factors. The aerogarden is specifically designed to optimize growth conditions for the included seed pods, which are carefully selected for their compatibility with the system. Using your own seeds may result in unpredictable growth patterns, lower germination rates, and potentially subpar harvests.
Additionally, certain seeds may not be suitable for the hydroponic environment of the aerogarden. It is recommended to follow the manufacturer’s instructions and use the provided seed pods for the best results. However, if you do decide to experiment with your own seeds, it is advisable to follow specific guidelines and techniques for adapting them to the Aerogarden.