Disclaimer
Hi, just letting you know that all products recommended here have been used by me, or are properly researched to ensure they are the best you are getting without bias.
I am also an affiliate for certain Amazon products and this means that some links here are affiliate links. If you purchase an item through any of them, I MAY earn a commission at no extra cost on you.
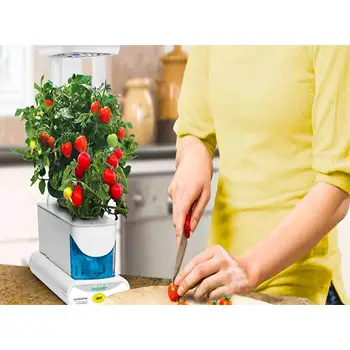
Indoor gardening with aerogardens, though very convenient and simplified, comes with some challenges for the users, especially newbies/beginners. Fortunately, the challenges can easily be solved when you know about them and how best to handle them. Knowing these aerogarden plant problems is a very necessary step to resolving them successfully without any effect on your plants.
Usually, user manuals do come with the supply of the aerogarden and it is important that you read this manual before you take the first step into this gardening venture. But, not much is covered in the guide regarding problems your plants might face. Not to worry, in this post I will discuss 21 plant problems and their associated solutions in great detail for your reference whenever necessary.

Aerogarden Plant Problems
There’s no doubt that when people say that nothing comes without challenges, they do mean it. For your aerogarden, there’s a small chance that you might run into one challenge or another regarding your plants. If that happens, don’t fret! You are not alone in it, there are many people that have been, and are currently in the same situation. Luckily there’s always a solution to every one of the aerogarden plant problems you might face.
PS: Click this link if you are looking for Useful Aerogarden Plant Hacks that would make the planting experience a breeze for you.
Solutions to common aerogarden plant problems
Let me walk you through common problems aerogardeners experience with their plants and the best solution to each. Even if you do not experience these now, keep them in mind for when they might happen so that you don’t get frantic and not know what to do at the moment.
1. What to do if your plants have poor or stunted growth
For its relevance to the overall well-being and survival of the plants, I’ll start with the problem of poor and stunted growth.
When the plants do not develop or grow as they should, chances are that there is a deficiency of certain essential chemicals and vitamins. The user manual enclosed in the supply pack of the aerogarden seeds gives both the uses and deficiency symptoms of all the essential nutrients. You might want to go over them to see what you have not been giving to your plants.
To address the issue of slow or stunted plant growth and development, make sure that the plants have regular and adequate availability of both sodium and potassium metals which are important for optimal growth and plant yield. And also, whatever more you find in the manual would put you in the right direction.
But sometimes, the failure of the plants to grow may not be connected with any deficiency but due to obstruction from light by taller and bigger plants. To prevent this from happening, always prune tall plants below new leaves to make sure that the necessary illumination gets to shorter plants in order to facilitate their growth and development.
2. What to do if your aerogarden plants look extremely sick
Your plants are bound to have a sickly look for different reasons ranging from poor nutrition, dehydration, bad illumination or attack by bacteria and other plant pathogens. Whatever the case may be, it is quite easy to reverse the poor plant look by making sure that all the necessities of the plants are met and in the correct concentration.
In the case of bad illumination, it is advisable to remove all obstacles that prevent adequate light from getting to the plant either by pruning taller plants or by raising the light sources using the aerogarden trellis.
Where infection or infestation is established as the cause of the sickly appearance, it can be solved by thorough cleaning and sanitization of the aerogarden using either vinegar or chlorine water. You can also apply safe pesticides when necessary to promote healthy plant growth.
3. What to do if your plants are struggling to grow
If your plants are finding it difficult to grow, it may have something to do with the non-availability of the nutrients that facilitate growth and proper plant development such as potassium, sodium, molybdenum or even carbohydrates. Simply find out their most prefered nutrients for growth through the manual and make the same available to them in the required quantities. This will surely improve their growth.
In some rare cases, however, the difficulty in growth may be related to the nature of the seeds themselves especially since certain seeds grow faster than others (even under the same conditions). To guard against this, choose very viable seeds from reliable manufacturers. You may also have to prune taller plants in the aerogarden in order to enable shorter plants to get more illumination that will make them grow better and fast.
You can also arrange the plants on the grow deck of the aerogarden such that the tallest plants will be at the back, the medium ones in the middle while the short ones are in front. This too will help plant growth and you are advised to use the format always.
4. What to do if your newly sprouted shoots are looking wilted and brown
Plants look brownish and wilted when they lack either potassium, sodium or magnesium in the required quantity. Consequently, the inclusion of these vital chemicals will result in more healthy colour changes after some time. You can know the precise quantities to add if you refer to the user manual with which the aerogarden seeds were supplied to you. Make sure that these nutrients are added regularly and on time in the correct concentrations to prevent any growth anomaly.
Wilting of plants also occurs whenever the plants are lacking enough water. A regular supply of water, as well as a good aerogarden pump, will suffice to solve wilting of any plants due to dehydration.
5. What to do if you find small brown spots on your aerogarden plants (eg basil, tomatoes, parsley etc)
Seeing brown spots on the leaves of your plants simply indicates any of two major causes. One, the plants might have been infected by certain bacteria or other plant pests and two, the plants may be deficient in some essential vitamins and minerals. Solving these problems effectively may require the use of safe recommended pesticides or cleaning and sanitizing the aerogarden with any chlorine bleach or vinegar. This will resolve any patchy discolouration of the leaves.
Secondly, you can supply the affected plants with all the essential nutrients in their water and the process of leaf spotting is bound to reverse itself. Going ahead to trim out the brown area won’t hurt too.
Ensure that when the plants get big, change the mixture of the nutrients every two weeks so that there is enough to feed the plant sufficiently. Check the pH of the mixture every time you make a fresh batch because the pH directly affects the plant’s ability to absorb different nutrients.
6. What to do if you find bugs on your plants
Sometimes, the plants may attract bugs which may be harmless and can be managed by using vinegar mix (vinegar and water 3:1) or bug traps. But in a situation where they get infected by bacteria and other plant pathogens carried by these crawling things, you need to act fast. This infection can be deduced through a number of symptoms the plants will exhibit.
Regular cleaning and sterilization of the aerogarden (both inside and outside) and all its accessories will go a long way in preventing any attack on the plants.
7. What to do if your tomatoes or other plants have yellow spots on them
Discolouration and yellowing of plant leaves are a symptom suggestive of the deficiency of certain essential nutrients. Yellowing of leaves in plants is mostly caused by either potassium or magnesium deficiency and the introduction of these nutrients in the water supply to the plants is most assuredly going to reverse the situation. To prevent the recurrence of this yellowing of plants, care must be taken to make sure that the plants are kept regularly supplied with all the essential nutrients in correct amounts at all times.
8. What to do if you find black spots on your aerogarden plants (basil, mint, parsley etc)
The appearance of black spots on plants is mostly a result of the bacterial attack on them and to both stop this attack and also prevent it from happening subsequently, you must make sure that the aerogarden is thoroughly cleaned before planting any new crops.
Mild black spotting of plants can also occur due to attack by some plant pathogens and to stop and prevent this, one may have to apply some safe pesticides that rid the plants of such.
In cases like black spots caused as a result of mint rust (which is an aggressive fungal infection that can cause black spots on your mint and can travel through spores in the air), anything that is infected may need to go’ in fact, you can go ahead to remove the stem holding all the leaves affected just to prevent it from spreading to others. Endeavour to provide good airflow to dry out the leaves and also refrain from spritzing the leaves of the plants.
9. What to do if your aerogarden leaves are falling off
Aerogarden plant leaves fall off mostly when the nutrients that accord strength to the plants are deficient in their food i.e plant nutrients.
Furthermore, leaves are liable to fall off when photosynthesis is affected in the plants either through poor illumination or the absence of any of the essential ingredients for it such as carbon dioxide, water or light. Whatever may be the cause(s), simply make sure that the plants are supplied with what they require in order to have enough tissue strength that will prevent the leaves from falling off.
10. What to do with aerogardens that won’t turn on after moving it
Sometimes it may become necessary for us to move with our aerogardens on some journeys and at the end of which our aerogardens may fail to come on when required. This is more severe in cases where the aerogardens have some water left in them. This water may spill into the lights or the lower port. The aerogarden will certainly fail to come on if water has spilt into the lower port which is the power part. This may cause the lights not to function properly with consequences on the growth or even the survival of your plants.
To resolve this issue, you may have to reach out to the MiracleGro customer care unit which is always willing to attend to such complaints.
To prevent such from ever happening, try to empty the water in your aerogarden when you want to take it on a journey. But be sure to hold a bottle of water and nutrients at hand especially if the journey would be a long one. Once in a while, pour in a little amount of water so that your plants won’t stay dehydrated. Continue the process to keep your plants hydrated and still not cause any harm to the aerogarden.
11. What to do if your own seeds in the aerogarden fail to grow
Any aerogardener can grow their own seeds in the aerogarden using the ‘Grow Anything Kit’. This can be done all year round and the food grown is safe for consumption. However, any plant that is grown on the ‘grow anything kit’ must be on the safe list. So, if any of your seeds fail to grow, two things are involved: it’s either the seeds are dead or they can’t grow in a hydroponic environment.
To ensure that what you intend to plant is going to do well in an aerogarden, check through the complete safe list of seeds you can plant to save yourself from disappointments.
And if the seeds fail to grow because they are dead, you just have to remove them and plant new seeds. It’s best to buy seeds from people who deliver the best, healthy, safe and non-GMO seeds that guarantee germination. No need to get seeds that would make you excited about its growth and then you see nothing. I’ll always recommend that you buy from trusted manufacturers like this Sustainable Seeds Company.
12. What to do when you notice your basil flowering
Unless you are growing your basil for its flowers or to get its seeds, you might want to stop them from flowering and no longer producing tasty leaves. For your basil to still taste great for a long and to keep them from flowering, you must remove those tiny tree-like things forming at the crown of the stalk. As it prepares to bolt or the buds start coming out, simply nip it in the bud or pinch the tops off to stop it from flowering. Though they might be pleasing to look at and smell very nice, they do not taste that good, they may even turn bitter in the process.
13. What to do to reset your aerogarden for the plant’s sake
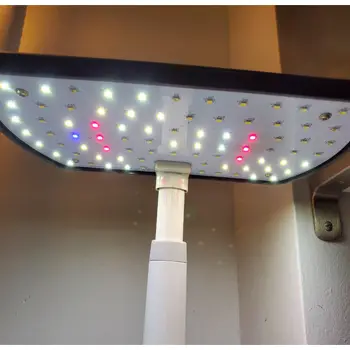
To reset your aerogarden does not take more than setting the ‘Lights OFF’ time. The ‘Grow Lights’ must be ON before you can reset the timer and resetting the aerogarden is of utmost importance especially since adequate illumination plays a vital role in both the growth and overall wellbeing of the plants.
To successfully reset the aerogarden, press and hold the ‘Lights’ button until the green light indicator beside your plant selection starts to blink. Thereafter, release the ‘Lights’ button and a short moment later, the ‘Grow Lights’ will turn off. Wait a few moments and turn it back on to start the cycle from the beginning.
It’s best to do this at the time you want it to start afresh. This is so that you won’t leave your aerogarden without light. Click this link to better understand how the light timing for aerogarden plants works.
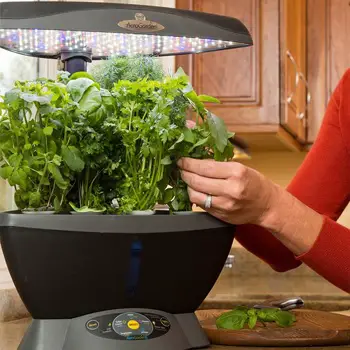
14. How to know when to clean your aerogarden
For optimal yield and unimpeded plant growth, all aerogardens should be cleaned before and after any planting session, after harvesting or in-between harvests. You can also clean your aerogarden at least once every week especially when the top gets dirty which you can use a soaked tissue or towel to wipe clean. Be sure not to use any chemical cleaners as they may damage the unit or even the plants too.
Thorough cleaning and sanitizing of your aerogarden should be carried out only when there are no seed pods left in the unit. This will reduce the risk of plant pathogens destroying your crops. Check this post to see steps on how clean your aerogarden with ease.
15. What to do if your pods are covered in moss/algae
Most times, we remove the sticker/paper on our pods or leave them open without a Grow Dome. And what happens when you do this is that you risk having moss or algae growing on your pods for free! Algae or moss can grow fast and wild when the moisture (water and nutrients) on the pod gets light, this is why you need to have your pods covered whether there is something in there or not.
The yellow sticker/paper/cover provides humidity and extra warmth which is good for the plants. It also keeps the light rays from reaching the water/nutrient mixture in the tank which can cause algae to grow there. The algae can be kinda gross, can kill your plants and can sometimes be hard to get rid of.
Though algae generally may not be a harmful thing. it can still ruin the planting experience. To fix the problem of moss or algae on your pods if you continue seeing them, you can use a small amount of food-grade hydrogen peroxide to get rid of them. Just add the required amount to the water bowl depending on the size of your aerogarden.
Measuring the right amount
- If you have a 2 and 3-pod aerogarden model, you should use 1 teaspoon of food-grade hydrogen peroxide.
- For 6 and 7-pod models, use 2 teaspoons.
- For 9-pod models, use 2 teaspoons.
- And for a 12-pod model, 2 tablespoons of food-grade hydrogen peroxide can do the trick.
Note that the ideal food-grade hydrogen Peroxide should be 35% H2O2 and 65% water. So, if you can find one like this, that’s great; if you can’t, I will recommend this one as it is very safe with plants.
In all, ensure to keep your pods closed with domes and stickers to prevent a reoccurrence. You should leave the sticker on for the duration of the plant’s life; if it starts to constrict the plant you can always rip it a little more to give more space. The domes can be taken off when the leaves are touching or very close to touching them.
And if you already have seeds germinating while the algae or moss is taking over, don’t be tempted to scrape any algae off or do anything to the pod itself. This is because the seeds are at a very delicate stage, Just use the above method to get rid of them and you are good.
16. What to do if your leaves are curling
Once you find out what is causing our aerogarden leaves to curl, your plants should bounce back as soon as you work on the root cause to get it fixed.
17. How to know plants that will grow best in an aerogarden
As earlier mentioned, not all seeds can grow or do well in an aerogarden. To know which one is fit to grow in an aerogarden, you need to first know how they grow outdoors before you can conclude.
Various seeds that do well in the aerogarden are seeds that do not grow too wild, tall, bushy or weighty. For instance, basil, mint, parsley, lettuce, bok choy, tomatoes, lavender, petunia, snapdragons etc; which are readily available in packaged seed pod kits are good to go.
Those plants that are taller than average such as sunflowers or others that grow in large bushes (eg rose flower), or those that produce heavy fruits like pumpkin, may not readily do well in an aerogarden unit (well, except you just need the aerogarden as a seed starting system with the intention of moving them later).
If you are not sure what plants you can safely grow in your aerogarden, please refer to this safe list of aerogarden plants.
18. What to do if your plants have white moulds
Sometimes, you might notice white mould growing on the leaves of your plants or their new sprouts. Don’t panic. This is mostly caused by a lack of light or ventilation. It could be that your Grow Light is not providing a strong enough light or your light is faulty and randomly goes off leaving your plants without light for a while. Or it could be that your plants are not getting enough air and may be feeling choked up by other plants or anything else (except new plants that need to stay covered with domes).
To solve this, you might want to know what the problem is, to begin with, and then you can know what to do. If the lack of light is the problem, you need to buy a stronger Grow Light or place it next to the window where the sunlight can help. If ventilation is the problem, place a fan blowing mildly next to the plants or trim back some plants if you notice they are getting choked up.
You need to be sure your plants are getting plenty of light and ventilation so the moulds do not take over. Also, consider using a natural plant mix spray to get rid of them and prevent more from coming. The mix can be 1 tablespoon baking soda, 1 teaspoon oil and 1 teaspoon castile soap in 1 gallon of water. Or you can use 3 tablespoons of apple cider vinegar for 1 gallon of water. Spray this mix lightly on the moulds and they will be gone before you know it. Just be sure to not spray too much to avoid burning the leaves.
19. What to do when your arugula or other plants are yellowing and wilting
On some occasions, you can just pass by and see your leaves yellowing and wilting. If this happens, don’t panic. The major thing that causes this is the plant nutrients you used: it’s either it has expired, you added too much or when you added the nutrients you did not mix them properly.
To solve this, you have to know where the problem lies. If the bottle of plant nutrients has expired, you might want to get a new one. If you added too many nutrients, you can take the plant tray out and run the roots under fresh water for a bit and then put more water in the tank to dilute it a bit. You might want to consider using a PPM meter to ensure that the nutrient level is measured and monitored properly always. And if you didn’t mix the nutrient properly before using, endeavour to shake the bottle of nutrients very well before adding it to the plant next time.
20. What to do when you notice fungus gnats on your Aerogarden
You might live in an area where you have fungus gnats and they might be coming in to mess with your plants. They can get into the substrate, water, leave their larvae in the sponge or do other things that might disgust you. If you find yourself in this situation, you might want to try mosquito bits or dunks as they are the common thing that works for fungus gnats. Simply get a dunk, break it up into small pieces and put it in a mesh bag to keep the bits in. Then place it in the water and let it float. Don’t worry, it can’t get into the pump as long as you secure the mesh bag tightly.
21. What to do when you need to change your plant water
To change the water in your aerogarden, first, remove any water that may be left inside the sink.
Remove the cover of the water basin and fill the sink almost completely with clean water at room temperature. Finally, rest the tray with the plants above the sink. After this, you are done with any water changing in the aerogarden for your plants.

Conclusion
Indoor gardening with the much-acclaimed aerogardens can come with some plant problems and associated risks that may drastically affect your plant and harvest. The good thing, however, is the fact that you can easily solve these plant problems if you adopt the correct approach and for this reason, you are advised to conduct effective research on every aspect of aerogardening before you set out. You can augment any research effort by asking questions and seeking answers from other aerogardeners who will teach you the ropes based on experience.
You can easily tell what any plant wants at the very beginning if you are well informed. It is usually easy to attend to most aerogarden plant problems as soon as they occur without any undue waste of time that may put your plants at unnecessary risk. Some seeds/plants have greater yield and are more resistant to attack by plant pathogens than others.
When you are very knowledgeable in the matter, you are most likely going to make very informed and beneficial choices than would have been the case otherwise.
Do you have any more questions about your plants that are not listed here? Feel free to drop them in the comment box and I’ll respond to them as soon as possible.
If you also have a better solution to the plant problems addressed here, do well to comment about them as they might come in very useful for others.